Capturing Screen Elements
When you capture a screen element in a third-party application, you define a connection between the Real-Time Client and the screen element. The Real-Time Client can then listen for events or send commands to the third-party application to control that screen element.
You can capture the elements of a screen in any order. From version 7.2, the Real-Time Designer displays a Capturing Assistant window when you capture screen elements, to make connectivity analysis easier. For details, see Capturing Assistant.
From version 7.3, you can capture multiple screen elements in the same capture, rather than having to capture each screen element individually.
To capture a screen element:
-
Select the Physical Objects tab and then, in the Physical Objects pane, select the Screen tab. For details about this tab, see Screen Window.
-
Run the third-party application in which you want to capture screen elements.
-
Do either of the following to trigger screen capturing:
-
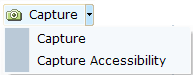
In the Real-Time Designer, click Capture (for most screen captures), or select the drop-down arrow next to the Capture button and select Capture Accessibility (to capture using the Accessibility connector).
The Real-Time Designer is minimized, the cursor changes to a target
 , and the Capturing Assistant appears in the bottom-right corner of your screen. For details, see Capturing Assistant.
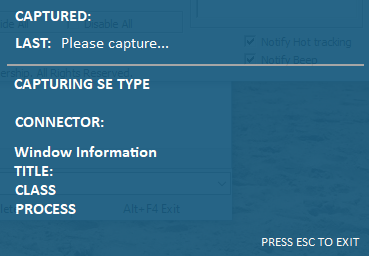
-
Alternatively, with the third-party application active, you can use a keyboard shortcut to trigger screen capturing. The default screen capturing keyboard shortcut is Ctrl+Shift+Z. The keyboard shortcut for screen capturing is configurable in the Real-Time Designer > Screen Capture branch of the System Settings window. Refer to the Configuring Real-Time Designer Settings chapter in the System Administration Guide for more details.
-
-
As you move the mouse over the third-party application interface, the Real-Time Designer draws a bounding rectangle around the screen element over which the cursor is located. This makes it easy for you to select the correct elements for capture.

The appearance of the bounding rectangle upon capturing process is configurable in the Real-Time Designer > Screen Capture branch of the System Settings window. The parameter name is Draw screen captures rectangle in Capture tool; its default value is True. Refer to the Screen Capture chapter in the System Administration Guide for more details.
-
Right-click or click a screen element once the element is bounded. For an explanation of the difference between right-click and standard (left) click when capturing screen elements, see Using the Snapshot Tab.
The Capturing Assistant is briefly hidden while the capture is taken, and then reappears, showing the details of the captured element.

If the Capturing Assistant is covering the screen element you want to capture, mouse over the Capturing Assistant to make it move up and out of the way.
-
Right-click or click on additional screen elements in the application to capture them.
-
When you have captured all the screen elements you need, press the Esc key.
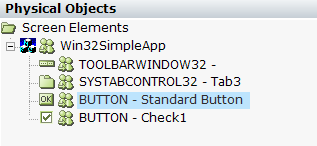
The captured screen element(s) appear in the Screen Elements tree in the Physical Objects pane.
Screen Scale and Layout
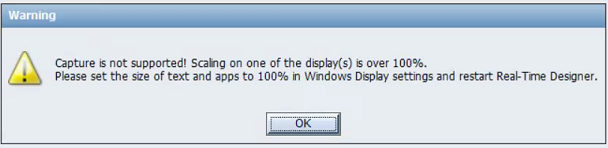
The Real-Time Designer is not high DPI-aware. In order to prevent problems interfacing with the various applications when capturing screen elements, in the Windows Display Settings, set the Scale and layout to 100%. When running the automations, the scaling is not an issue unless you use specifically use screen coordinates/screen rectangles, in which case, the Real-Time Client computer should be scaled to 100%.
If you try and capture when the scaling on one of the displays is over 100%, an error appears. In Windows, Display Settings, set the size of the text, apps and other items to 100%, and then restart Real-Time Designer. When Real-Time Designer is started the details of all plugged in displays are logged:
2019-11-12 10:41:29,990 [1] INFO ScaleTest - OS Windows Version: 10.0.17134 (Windows 10 or above)
2019-11-12 10:41:29,990 [1] INFO ScaleTest - Display 1: Resolution: [1920:1080]; Scale: 100%; DPI: 96
2019-11-12 10:41:29,990 [1] INFO ScaleTest - Display 2: Resolution: [1920:1080]; Scale: 125%; DPI: 120
Capturing Assistant
From version 7.2, the Real-Time Designer displays a Capturing Assistant window when you capture screen elements, to make connectivity analysis easier. This useful diagnostic tool appears in the bottom-right corner of your screen when you are capturing screen elements, and provides immediate, visual feedback, enabling you to see what you are capturing.
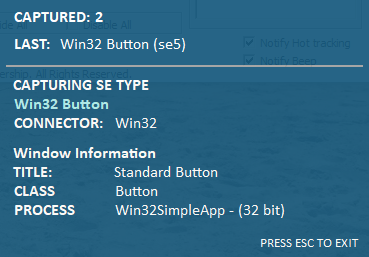
The window shows you the following:
-
Captured: The number of screen elements you have captured.
-
Last: The last screen element you captured, including its type and unique screen element ID assigned by the Real-Time Designer.
-
Capturing SE Type: The type of the screen element that is currently under the cursor (target).
-
Connector: The connector that will be used to capture the screen element that is currently under the cursor (target), if you click to capture it.
-
Window Information: The Title, Class, and Process of the screen element that is currently under the cursor (target).