


Working with the Power Builder Extension
The object’s hierarchy is automatically created as you capture DataWindow objects.
To view the object hierarchy:
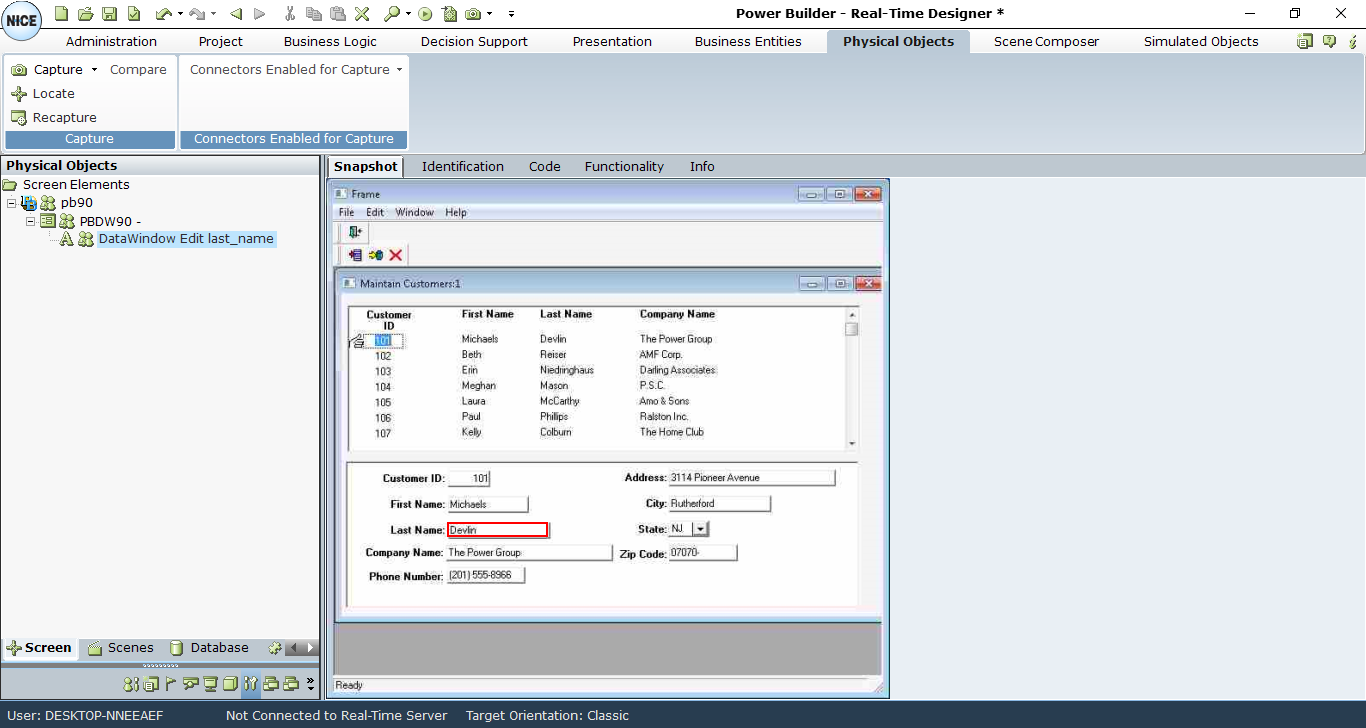
| 1. | Run the PowerBuilder development environment, open or create a workspace, and run the target with the application. |
| 2. | In the application, capture the DataWindow control (see Capturing a Screen Element for details). |
| 3. | In Real-Time Designer, navigate to the Physical Objects tab. |
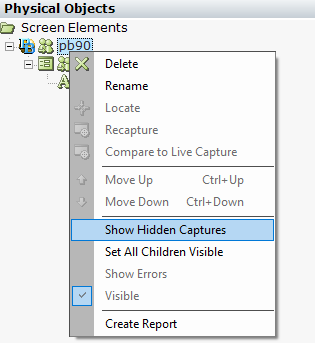
| 4. | In the root control (process-level), right-click and select Show Hidden Captures. |
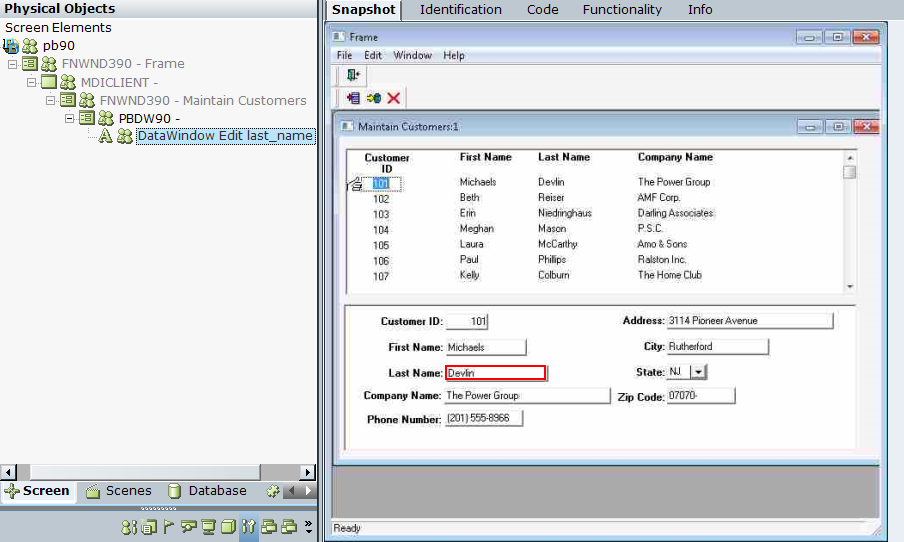
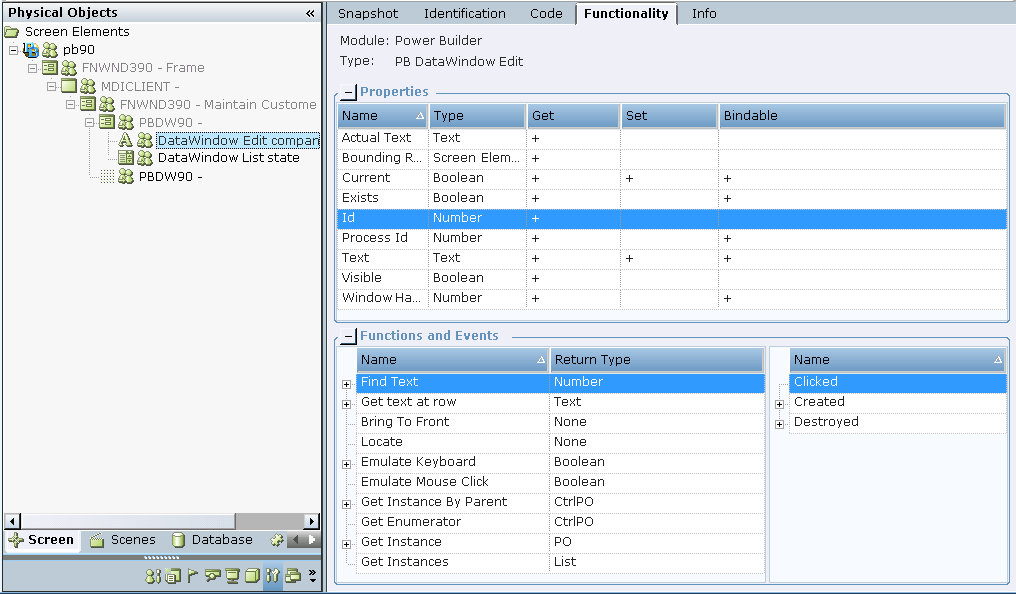
The hierarchy of controls with the identifiers appears in the Screen Elements tree on the left. This includes additional branches that show the lower-level information.
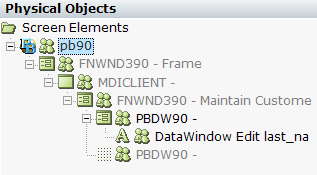
The root screen element’s level is a Process. The next levels are a sequence of Win32 Form and General Win32 screen elements. At the bottom of the hierarchy, the Power Builder DataWindow Form appears with the captured screen element of one of the Power Builder DataWindow types.
Real-Time Designer and Client provide the capabilities for locating screen elements that are captured in the Power Builder application.
To locate captured Power Builder DataWindow screen elements:
| 1. | To locate a captured Power Builder DataWindow screen element in the hierarchy, expand the Screen Elements tree and find the required screen element. |
| 2. | To show a captured control in the Power Builder application’s window, right-click the screen element in Screen Elements tree and select Locate (see Locating a Screen Element for details): |
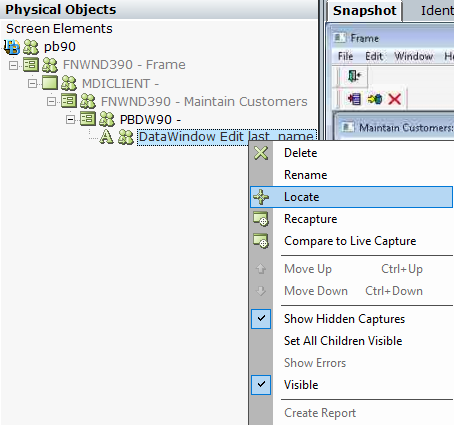
The element is framed in the application’s window by a blinking rectangle.
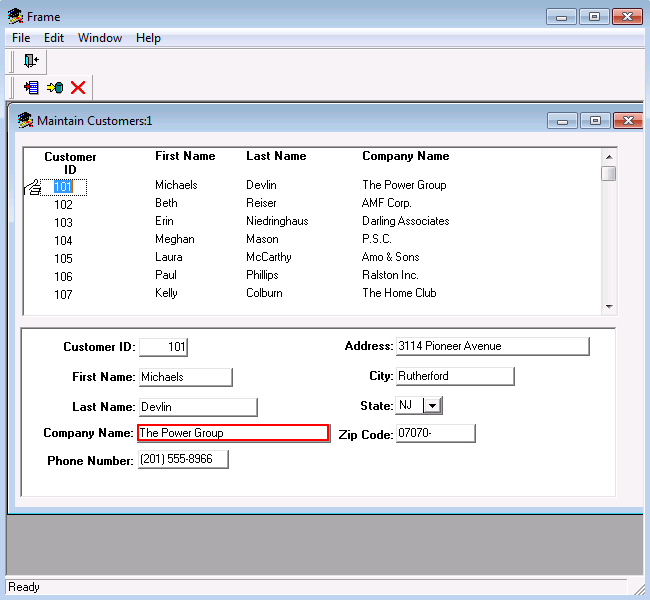
| 3. | To locate a Power Builder DataWindow screen element in a screenshot, click the Snapshot tab. A snapshot of the application window is displayed with the captured screen element framed in red. |
| 4. | To locate the Power Builder DataWindow screen element during runtime, see Locating a Screen Element During Runtime. |
You can select each level of the captured screen element’s hierarchy in the Screen Elements tree to display its details detected by the Real-Time Designer automatically in the Identification tab.
For more information about the Process screen element type, see Viewing Details of the Power Builder Process.
To view screen element identification details:
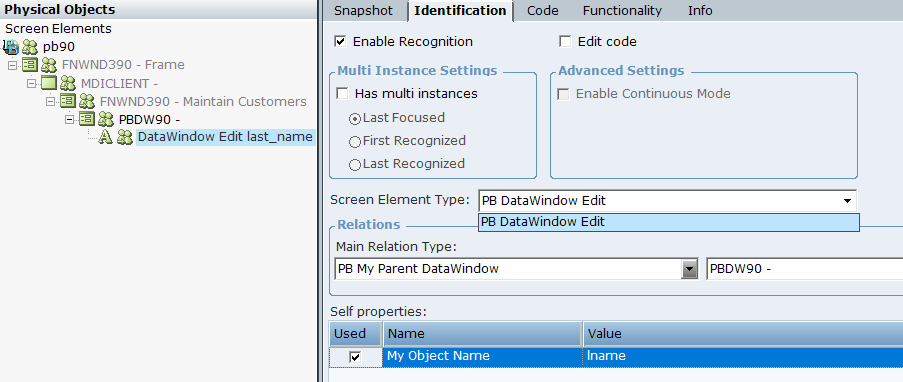
| 1. | Select a captured Power Builder DataWindow screen element in the Screen Elements tree and click the Identification tab. |

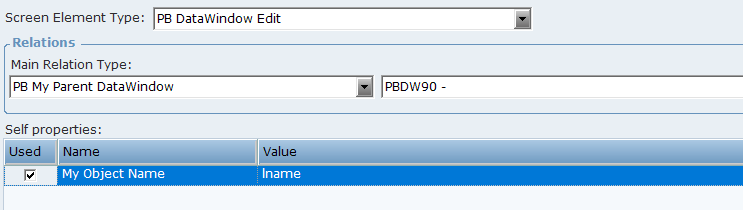
The screen element type is defined in the Screen Element Type drop-down list (in this case, PB DataWindow Edit).
In the Power Builder Extension, the Screen Element Type drop-down list displays only the item that corresponds to the type of screen element captured.
You cannot manually change the type of the Power Builder DataWindow screen element. You and will need to capture the relevant DataWindow object first in order to work with the corresponding screen element type.
The Power Builder extension enables you to identify DataWindow objects of the following types:
PB DataWindow
PB DataWindow Button
PB DataWindow Edit
PB DataWindow Field
PB DataWindow Form
PB DataWindow Grid
PB DataWindow Label
PB DataWindow List
PB DataWindow Object
PB DataWindow Table
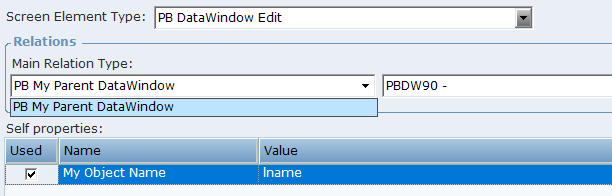
| 2. | Click the Main Relation Type drop-down list to show the available relations types for the Power Builder DataWindow screen element. The list of items in the Main Relation Type depends on the Power Builder DataWindow screen element type: |
The available Main Relation Type for the PB DataWindow Button, PB DataWindow Edit, PB DataWindow Field, PB DataWindow Label, and PB DataWindow List screen element types is the BP My Parent DataWindow. This type indicates the screen element’s parent object, located one level above in the hierarchy.
The available Main Relation Types for the PB DataWindow Form, PB DataWindow Grid, PB DataWindow Object, and PB DataWindow Table screen element types include the following.
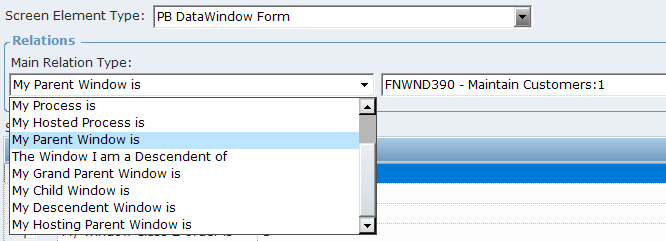
The Process I am a Top Window of: Indicates a parent Process level, under which the screen element was captured. This relation type is only applicable when defining the relation of a top window in the hierarchy.
The Process Top Window I am a Child of: Indicates a parent Process level.
The Process I am a Top Window Hosted of: Indicates a Process where top window is hosted.
My Parent Window is: Indicates the screen element’s parent object, which is one level above in the hierarchy.
The Window I am a Descendent of: Indicates the screen element’s parent object, which is located at any level above in the hierarchy.
The NET Process level cannot be indicated for The Window I am a Descendent of relation type.
My Process is: Indicates the Process level under which the screen element has been captured. This relation type is applicable to any object in the screen element’s hierarchy.
My Hosted Process is: Indicates the Process under which the screen element has been hosted.
My Grand Parent Window is: Indicates the grandparent window.
My Child Window is: Indicates the screen element’s parent object, which is one level above in the hierarchy.
My Descendent Window is: Indicates the screen element’s descendent window.
My Hosting Parent Window is: Indicates the screen element’s parent window.
| 3. | Next, set the Self properties of the screen element type. The Self properties section lists the properties that can be used to uniquely identify the PB DataWindow screen element type. Real-Time Designer automatically selects the self-properties in the Used column that can optimally identify the screen element. |
The default order of the Self properties can not be changed for the Power Builder extension.
The list of available Self properties depends on the PB DataWindow screen element type:
The available Self properties for the PB DataWindow Button, PB DataWindow Edit, PB DataWindow Field, PB DataWindow Label, and PB DataWindow List screen element types is the My Object Name. This type indicates the name of the DataWindow object captured that is defined in the Power Builder’s application.
The available Self properties for the PB DataWindow Form, PB DataWindow Grid, PB DataWindow Object, and PB DataWindow Table screen element types include the following:
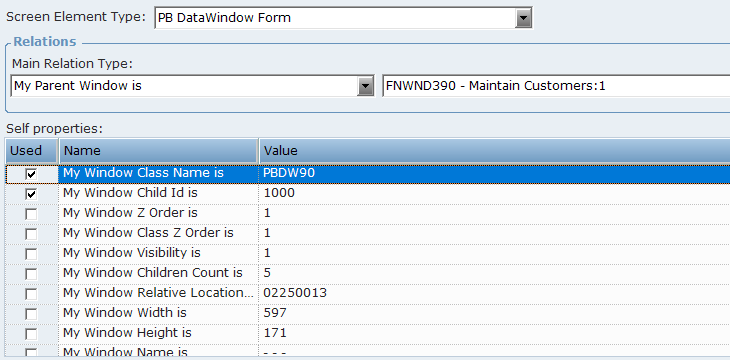
My Window Class Name is: Provides the name of the class to which the specified physical object belongs. For example, PBDW90.
My Window Child Id is: Provides the ID of the window.
My Window Z Order is: Indicates the window's position in a stack of overlapping windows. This window stack is oriented along an imaginary axis, the z-axis, extending outward from the screen. The window at the top of the z-order overlaps all other windows. The window at the bottom of the z-order is overlapped by all other windows. When an application creates a window, the system puts it at the top of the z-order for windows of the same type. You can change the z-order by activating a different window. The system positions the active window at the top of the z-order for windows of the same type. When a window comes to the top of z-order, so does its child windows.
My Window Class Z Order is: Indicates the class of window’s position in a stack of overlapping windows.
My Window Visibility is: Gets a value that indicates whether the physical object is currently visible or hidden.
When the window is visible the physical object is recognized.
When the window is hidden the physical object is destroyed until the window becomes visible again.
My Window Children Count is: Gets a count of the child objects.
My Window Relative Location is: Enables you to identify a window, based on the location of its parent window. The format for this property's value is YYYYXXXX, where YYYY indicates the Y offset and XXXX indicates the X offset (including a leading zero) from the parent window. For example, the 02250013 value shown above indicates that the window location has an offset of (0013,0225) from its parent window.
My Window Name is: Provides the name of the DataWindow physical object.
My Window Accessible Name is: Provides an accessible name of the DataWindow physical object.
6. Select Has multi instances to define that the PB DataWindow screen element has multiple instances. For more about using multi-instances functionality, refer to Multiple Instances of the Same Application.
By default, the Has multi instances checkbox is cleared when you captured a DataWindow physical object.
Viewing Details of the Power Builder Process
To view details of the Power Builder Process:
| 1. | Select the Process level of the captured PB DataWindow screen element in the Screen Elements tree and click the Identification tab. |
The Relations section does not appear for the Process screen element type in the Identification tab.
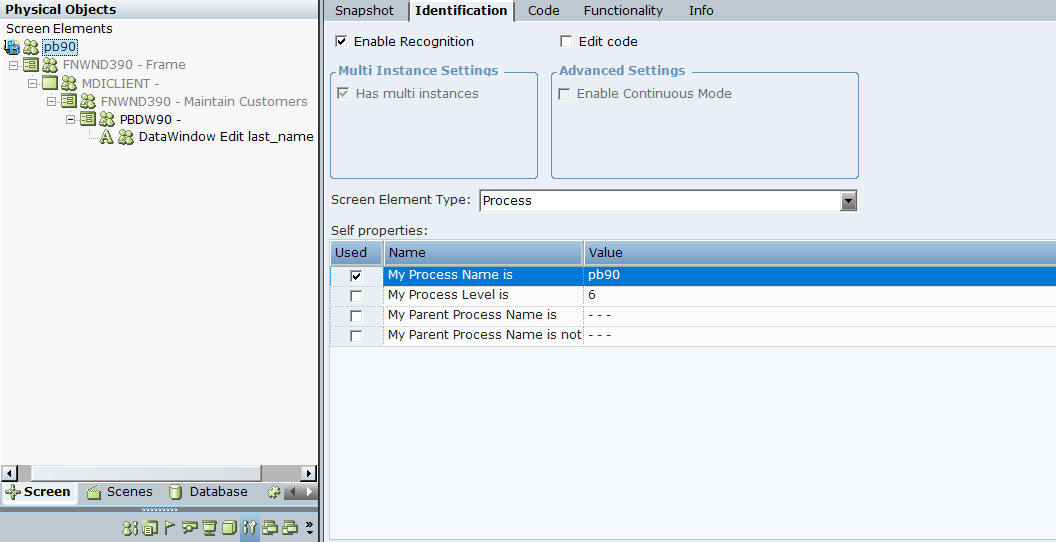
Additionally, the Has multi instance checkbox is selected by default. This option is not editable for the NET Process.
| 2. | Open the Screen Element Type drop-down list (only one Process appears in the list). |

The Self properties section lists the properties that can be used to uniquely identify a Process type.
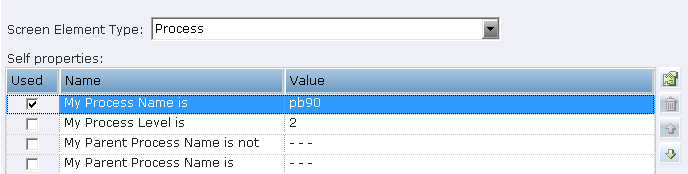
My Process Name is:Provides the name of the Power Builder application process in the process tree. You may use the Process Explorer utility (or standard Windows Task Manager) to verify the name of the process.
My Process Level is: Specifies the level of the process in the process tree, thereby enabling you to handle scenarios where applications have more than one process on different levels. You may use the Process Explorer utility to verify the process level.
My Parent Process Name is not: Provides the name of the process; this cannot be a parent process (the process is at a higher level than the relevant process).
My Parent Process Name is: Provides the name of the parent process (if such a process exists).
All Power Builder DataWindow screen elements types have their own properties, functions, and events. To view this functionality, navigate to the Functionality tab or locate it in the Project tab library in Real-Time Designer.
To view the functionality of the DataWindow controls:
| 1. | Select the captured .NET screen element in the Screen Elements tree and click the Functionality tab. This tab shows the functionality of the selected screen element. For more information, see Understanding the Power Builder Screen Element Hierarchy. |

To navigate to the functionality view of any Power Builder DataWindow screen element in the Functionality tab, you must first capture the DataWindow object.
| 2. | To view the Power Builder DataWindow screen element functionalities in the library in Real-Time Designer: |
| a. | Select the Project tab, and then expand the Library References node under References. |
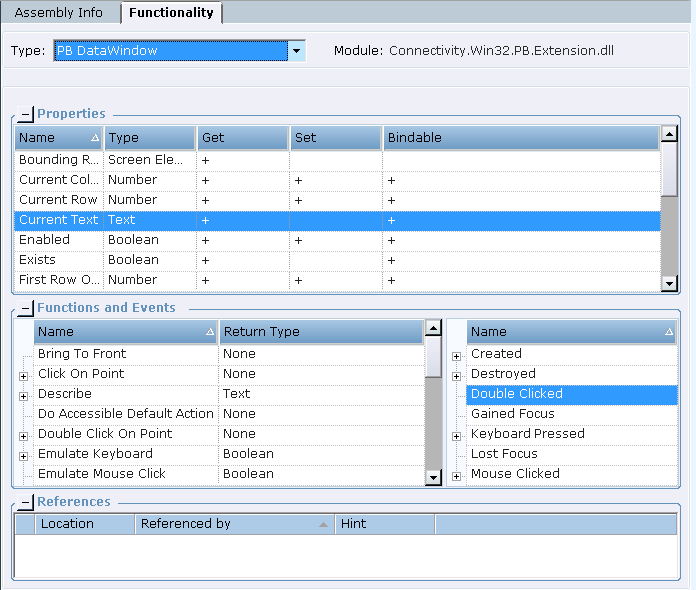
| b. | Select the Connectivity.Win32.PB.Extension library in the tree. The Assembly Info tab opens and displays information about the library (dll file). |
| 3. | Click the Functionality tab. |
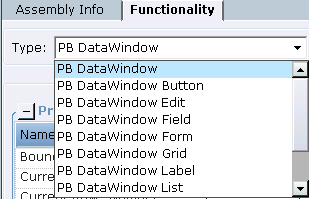
| 4. | From the Type drop-downlist, select a Power Builder DataWindow screen element type. |
The element properties, functions, and events appear in the corresponding tables below.
The Real-Time Client enables you to run a project with screen elements in order to view and edit the project's values and processes behind the scenes. The Screen Elements tab in the Monitor window enables you to monitor Real-Time Designer screen elements. All screen elements, including hidden ones, are automatically shown in the Navigation pane of the Monitor window.
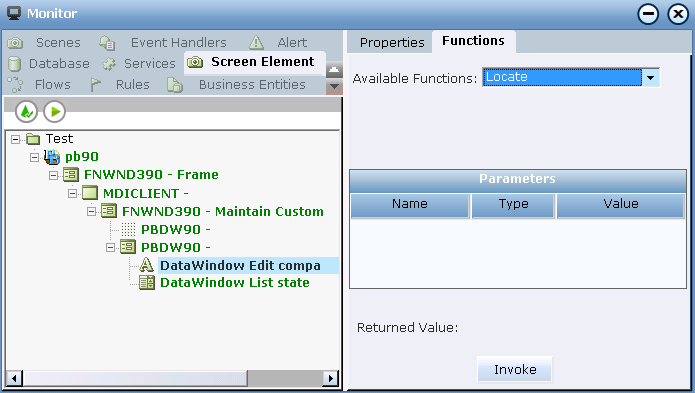
In the following example, the screen properties and functions of a Power Builder DataWindow Edit screen element are displayed in the Monitor window.
To view Power Builder DataWindow screen elements during runtime:
| 1. | Run the project and select Monitor. For more information, see Running the Monitor. |
| 2. | Click the Screen Element tab and then select the relevant screen element in the tree on the left. |
The list of screen element properties is shown in the Properties tab on the right.
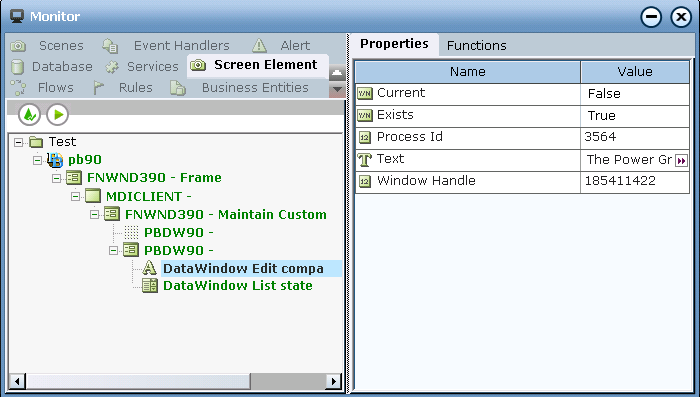
The Monitor displays only properties of simple types (for example, Boolean, DateTime, Decimal, Number, and Text). To view other property types (for example, List type, Screen Element Rectangle type, and other Libraries screen elements types), you must bind them to business entities in the project (see Business Entities for details).
| 3. | Click the Functions tab. |
The functions of the screen element are listed in the Available Functions drop-down list.

The Monitor window displays only functions of simple return types are shown. The functions of types such List, PO and CtrlPO are not shown. To use functions that are not shown, you need to define them in the Business Entities module (see Business Entitiesfor details).
Locating a Screen Element During Runtime
To locate a screen element in the Power Builder application:
In the Available Functions drop-down list, select the Locate function and then click Invoke.
The Monitor is minimized and the control appears framed in the Power Builder application with a blinking red border.
The other functions of the selected Power Builder DataWindow Edit are listed in the Monitor's Available Functions drop-down list, and include:
Find Text: Find specified text in the DataWindow object’s cell. For this function you will to need to define the value of Text parameter, and then click  .
.
Get text at row: Gets the cell text for the specified row (1 based index). The parameter of the function is Row of the Number type.
Bring to front: Moves the .NET screen element to the top of the stacking order thereby bringing object to the front.
Emulate Keyboard: Emulates the text entered from the keyboard. For this function, you need to specify the value of the Text parameter by defining the text that you want to emulate.
You need to verify that the object is in focus before invoking the Emulate Keyboard function.
Emulate Mouse Click: Emulates a right-click on the DataWindow object.