


Working with the Win32 Connector
This section explains how to ensure Real-Time Designer works properly with the Win32 Connector.
Capturing Assistant
From version 7.2, when capturing, Real-Time Designer displays a Capturing Assistant window which makes connectivity analysis easier.
This useful diagnostic tool provides immediate, visual feedback, enabling you to see what you are capturing.
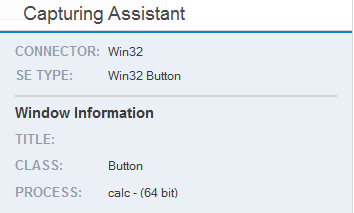
The window shows you the following:
Connector
Screen Element Type
Window Information: Title, Class and Process
Enabling Real-Time Designer to Work with the Win32 Connector
To enable Real-Time Designer to work with the Win32 Connector:
| 1. | Complete the Real-Time Designer installation process (see Advanced Process Automation Client and Designer Installation Guide). |
You do not need to configure Win32 as a connector upon installation, unlike other connector types. Real-Time Designer is installed with Win32 connector by default.
| 2. | Start Real-Time Designer and select the Physical Objects tab. Win32 is selected by default in the Connectors Enabled for Capture drop-down list: |

You cannot disable the Win32 Connector. Unlike other connector types, the Win32 connector is always enabled in Real-Time Designer.

When you run a Win32 application, you do not need to configure the application to capture objects. Real-Time Designer automatically connects to the Windows API .
You can find the Win32 connector’s settings in the RTDesigner.exe.config file, under the </configuration> section:
<screenPluginWin32Config SelfPropsRecOrder_IdentifierChild="ClassName,WinName,ChildId" SelfPropsRecOrder_Location="ClassName,WinName,ChildId" SelfPropsRecOrder_Normal="ClassName,WinName,ChildId,Z_Order" SelfPropsRecOrder_Normal_TopMost="ClassName,WinName" WinName_UnRelevantClasses="EDIT,TEXTBOX,PBDW" Z_Order_UnRelevantClasses="#32770" ChildId_UnRelevantClasses="#32770" Tab_Classes="SYSTABCONTROL32" Edit_Classes="EDIT,TEXTBOX" Listview_Classes="SYSLISTVIEW32" Combo_Classes="COMBOBOX" Toolbar_Classes="TOOLBARWINDOW32" Listbox_Classes="LISTBOX" Tree_Classes="SYSTREEVIEW32" Grid_Classes="MSFLEXGRIDWNDCLASS" Slider_Classes="MSCTLS_TRACKBAR32" Button_Classes="BUTTON" MultiInstanceClasses="MDICLIENT,CHROME_RENDERWIDGETHOSTHWND,MOZILLAWINDOWCLASS" AtFailureShowUserAlert="false" AtFailureShowUser2Options="true" AtRecognitionUseLocationToDistinguish="true" AtRecognitionUseIdentifierChildToDistinguish="true" FastestRecognition_Normal="true" FastestRecognition_Location="false" FastestRecognition_IdentifierChild="false" StatusBar_Classes="MSCTLS_STATUSBAR32" Extensions_Section="win32PluginEnumerator" />
The settings of the Win32 Connector in the RTDesigner.exe.config file are the same as in the System Settings window in Real-Time Designer.
| 4. | If the Real-Time Designer installation has been performed correctly, you should be able to capture any Win32 screen element type in the Win32 application (see Capturing Win32 Screen Elements). |
The Win32 Connector cannot be captured if its process has a higher Integrity level than the RTDesigner.exe process (for example, the Task Manager under Windows 8\8.1). To capture such an application, you must run Real-Time Designer as an Administrator. In this case, the Real-Time Designer process has the highest Integrity level and can capture a Win 32 application with the same Integrity level.
Capturing Win32 Screen Elements
When you capture Win32 physical objects, a hierarchy is automatically created in the Real-Time Designer.
To capture a Win32 screen element:
| 1. | Run the Win32 application you want to capture and open Real-Time Designer. |
| 2. | Capture the Win32 element within the application. |
| 3. | In Real-Time Designer, navigate to the Physical Objects tab. |
The hierarchy of the screen elements is displayed in the Screen tab. The top level is the calc process level. The bottom level is the captured Win32 element.

| 4. | To see hidden captures in the Screen Elements tree, right-click the Process screen element level (the calc screen element in this example) and select Show Hidden Captures. See Screen Elements Hierarchy. |

The root screen element’s level is a Win32 Process.
The next level is the Win32 Form screen element, which is the parent to the rest of the Win32 screen elements, including the captured screen element at the bottom of the hierarchy.
Each Win32 screen element has its own class name that starts with the Win32 prefix.
Locating Objects
Real-Time Designer and the Real-Time Client enable you to locate screen elements that have been captured in the Win32 application.
To locate captured Win32 elements:
| 1. | To locate a captured Win32 screen element in the hierarchy, expand the Screen Elements tree: |
You can locate any screen element’s level except for the process level..
| 2. | To show a captured element in the Win32 application window, right-click the Win32 screen element in the Screen Elements tree and select Locate, or click Locate on the ribbon: |

Real-Time Designer is minimized, and the Win32 element appears framed in red:

| 3. | To locate the Win32 screen element in the screenshot, click the Snapshot tab. |
A snapshot of the application window is displayed with the captured screen element framed in red:

| 4. | To locate the Win32 screen element during runtime, see Using Win32 Office Screen Elements During Runtime. |
Viewing Win32 Identification Details
You can select each level of the captured Win32 screen element’s hierarchy in the Screen Elements tree to display the details automatically detected by Real-Time Designer in the Identification tab.
Viewing Win32 Screen Element Identification Details
For details on how to work at the Win32 Process level, see Viewing Identification Details of a Win32 Process.
To view the Win32 screen element details:
| 1. | Select the captured screen element in the Screen Elements tree and click the Identification tab. |
Real-Time Designer automatically identifies the type of the captured screen element, and shows it in the Screen Element Type drop-down list.

| 2. | Open the Screen Element Type drop-down list to view other Win32 screen elements types. |

The following elements are available:
General Win32
Win32 List View
Win32 Edit
Win32 Tab
Win32 Combo
Win32 Tool Bar
Win32 List Box
Win32 Tree View
Win32 Flex Grid
Win32 Radio Button
Win32 Check Box
Win32 Button
Win32 Slider
Win32 Form
Win32 Poller
Win32 Status Bar
Win32 Poller is a class that identifies a screen element based on its self-properties, where some of these self-properties may change without an event after the screen element has been identified. In such dynamic cases, the screen element type should be manually changed to Win32 Poller. The Poller type functionality includes a Text property that is updated every time the screen element is polled.
| 3. | In the Identification tab, select a main relation type for the Win32 screen element from the Main Relation Type drop-down list. |

The following main relation types are available:
|
Main Relation Type |
Description |
|---|---|
| The Process I am a Top Window of | A parent Process level, under which the screen element was captured. This relation type is only applicable for defining a relation of a top window in the hierarchy. |
| The Process Top Window I am a Child of | A parent Process level. |
|
The Process I am a Top Window Hosted of |
A process where the top window is hosted. |
| My Parent Window is | The screen element’s parent object located one level above in the hierarchy. |
| The Window I am Descendant of | The screen element’s parent object located at any level above in the hierarchy. |
| My Process is |
The process level, under which the screen element has been captured. This relation type is applicable for any object in the screen element’s hierarchy. |
| My Hosted Process is | The process, under which the screen element has been hosted. |
| My Grand Parent Window is | The grand parent window. |
| My Child Window is | The screen element’s parent object located one level above in the hierarchy. |
| My Descendent Window is | The screen element’s descendent window. |
| My Hosting Parent Window is | The screen element’s parent window. |
| 4. | Select the required self-properties in the Self properties section. The Self properties section lists the self-properties that can be used to uniquely identify the Win32 screen element type. Real-Time Designer automatically selects the properties in the Used column that can optimally identify the screen element. |

The default order of self properties can be changed for the Win32 Connector in the Real-Time Designer’s System Settings window. See the Win32 Plugin Configuration chapter in the System Administration Guide.
The following self-properties are available:
|
Self-property |
Description |
|---|---|
| My Window Class Name is | The name of the class to which the specified physical object belongs (for example, BUTTON). |
|
My Window Children Count is |
The number of child objects. |
| My Window Visibility is |
Identifies a window based on its visibility. When the window is visible, the physical object is recognized. When the window is hidden, the physical object is destroyed until the window becomes visible again. |
| My Window Relative Location is |
Identifies a window based on the location of its parent window. The format for this property's value is YYYYXXXX, where YYYY indicates the Y offset and XXXX indicates the X offset (including a leading zero) from the parent window. For example, the 00640078 value (see the screenshot above) indicates that the window location has an offset of (0064,0078) from its parent window. |
| My Window Width is | Window width in pixels. |
| My Window Height is | Window height in pixels. |
| My Window Child Id is | The window ID. |
| My Window Z Order is |
The window position in a stack of overlapping windows. A window stack is oriented along an imaginary axis, the z-axis, extending outward from the screen. The window at the top of the z-order overlaps all other windows. The window at the bottom of the z-order is overlapped by all other windows. When an application creates a window, the system puts it at the top of the z-order for windows of the same type. You can change the z-order by activating a different window. The system positions the active window at the top of the z-order for windows of the same type. When a window comes to the top of z-order, so do its child windows. |
| My Window Class Z Order is | The class of the window’s position in a stack of overlapping windows. |
| My Window Name is | A window name where Win32 physical object is hosted. |
| My Window Accessible Name is |
Provides accessibility support. Accessibility support enables you to identify a given screen element and to activate its default action. For example, for a button, the default action is to click the button. This feature is ideal when you have a Win32 application that has a control whose functions you cannot invoke using standard Win32 functions (for example, GUI libraries in which vendors have implemented extensions to Win32 functionality by creating additional buttons). Custom buttons created in this manner may not support a Win32 click function, thus limiting Real-Time Designer's ability to recognize them as buttons. In such cases, you can use accessibility options to generate a click event, whereas otherwise you could not. |
| My Child Window Class Name is | Gets the name of the class, to which the child object belongs. |
| My Child Window Name is | Indicates having a child with specified name. |
| My Child Window Accessible Name is | Indicates having a child with specified accessible name. |
| My Child Window Child Id is | Indicates having a child with this ID. |
| My Child Window Children Count is | Indicates having a child with defined children count. |
| 5. | By default, the Has multi instances option is cleared when you capture a Win32 physical object. You can change the default value. For more information, see Enabling Real-Time Designer to Work with the Win32 Connector. |
Viewing Identification Details of a Win32 Process
To view Identification details of a Win32 Process:
| 1. | Select the process level of a captured Win32 screen element in the Screen Elements tree and click the Identification tab. |
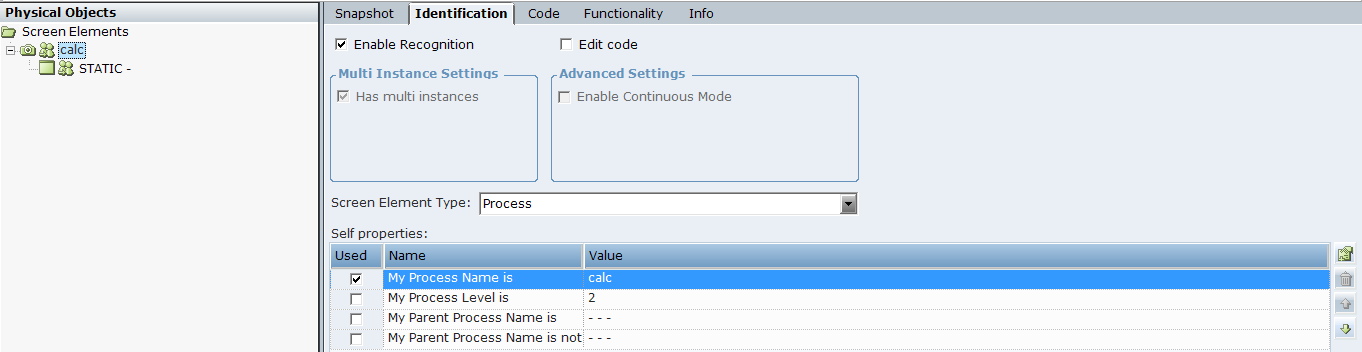
In the Identification tab for Win32 Process screen elements, the Has multi instance option is selected and disabled by default. This option is not editable for a Win32 Process. The tab also does not include the Relations section.
The Screen Element Type drop-down list includes the Process type only, which is automatically detected by Real-Time Designer.

| 2. | Select the required self-properties in the Self properties section. |
The Self properties section provides a list of properties that can be used to uniquely identify the Win32 Process type. 
The following self-properties are available:
|
Self-property |
Description |
|---|---|
| My Process Name is | The process name of the Win32 application in the process tree. You can use the Process Explorer utility (or the Windows Task Manager) to verify the name of the process. |
| My Process Level is | The level of the process in the process tree. Enables you to handle scenarios where applications have more than one process on different levels. You can use the Process Explorer utility to verify the process level. |
| My Parent Process Name is | The name of the parent process (if such process exists). |
| My Parent Process Name is not | The name of the process, which can’t be a parent process (the process one level higher). |